Jam's story
[Spring] 스프링시큐리티 - 로그인 본문
STSSecurity
- 웹 개발자가 해야할 웹 보안 3가지
- 인증 (Authenication) - 로그인 (현재 사용자) 확인
- 인가 (Authorization) - 현재 사용자 권한
- 권한 없을 시 UI 처리
- [수정][삭제]버튼 = 보이지x , 비활성화
- 롤 (role == 역할) 개념 도입
- 사용자접근제어
- ROLE_ADMIN, ROLE_MANAGER, ROLE_USER
- 스프링 시큐리티 프로젝트 - 웹 보안 측면 구현 유사한 기본 틀
- 기본 제공 + 확장
- 보다 빠르게 웹 보안 (인증, 인가) 를 구현할 수 있다.
- 공지사항
- /customer/noticeDetail.htm 요청 인증
- /customer/noticeReg.htm 요청 인증 + 인가 (관리자)
- 그 외 공지사항 요청은 인증 X, 인가 X 허용
5.pom.xml에 의존 모듈 설정
ㄱ.spring-security-web
ㄴ.spring-security-tablig
ㄷ.spring-security-config
6. 스프링 시큐리티 관련된 설정 파일
📌모듈을 추가할때는, mavenReposity를 들어가서 , 필요한 모듈을 검색후 알맞는 버전을 선택하면 소스가 나온다.
<version>${org.springframework-version}</version>라고 쓰면 해당하는 버전에 맞게 알아서 맞춰진다.
1️⃣pom.xml에 추가
<!-- https://mvnrepository.com/artifact/org.springframework.security/spring-security-config -->
<!-- 보안 -->
<dependency>
    <groupId>org.springframework.security</groupId>
    <artifactId>spring-security-web</artifactId>
    <version>${org.springframework-version}</version>
</dependency>

<dependency>
    <groupId>org.springframework.security</groupId>
    <artifactId>spring-security-config</artifactId>
    <version>${org.springframework-version}</version>
</dependency>

<dependency>
    <groupId>org.springframework.security</groupId>
    <artifactId>spring-security-taglibs</artifactId>
    <version>${org.springframework-version}</version>
</dependency>
pom.xml을 수정하고나면 서버를 재시작해서 에러(충돌)이 있는지 검사해보자
📌pom태그를 했는데도, 문제가 있다면 STS를 들어가서 로컬저장소(C:\Users\kimjm\.m2\repository)에가서
repository를 삭제하고 pom.xml을 다시 시작
2️⃣WEB-INF/spring/spring-security.xml 파일 넣기 - 보안과 관련된 것들 넣기

3️⃣방금 pom.xml 에 보안관련 모듈을 추가하였기 때문에 nameSpace를 누르면 security가 뜬다 +체크

4️⃣web.xml에 가서 spring-security.xml을 읽을 수 있도록 추가
	<context-param>
		<param-name>contextConfigLocation</param-name>
		<param-value>
		/WEB-INF/spring/root-context.xml
		/WEB-INF/spring/spring-security.xml
		</param-value>
	</context-param>
5️⃣web.xml + 보안필터 추가
<!-- p 661 spring security 관련 필터를 추가 -->
   <filter>
      <filter-name>springSecurityFilterChain</filter-name>
      <filter-class>org.springframework.web.filter.DelegatingFilterProxy</filter-class>
   </filter>
   <filter-mapping>
      <filter-name>springSecurityFilterChain</filter-name>
      <url-pattern>/*</url-pattern>
   </filter-mapping>
스프링에서 시큐리티를 사용하기 위한 환경설정 마무리
실습
1)공지사항 목록보기 notice.htm 요청-> 로그인안해도된다. (인증x, 권한 x) = 인증받지 않아도 아무나 사용가능
2) 공지사항 상세보기 noticeDetail.htm 요청->인증O, 권한 x = 로그인만 하면 읽을 수 있다.
3)공지사항 쓰기 noticeReg.htm 요청->인증O, 권한 O =관리자 권한이 있어야 한다.
스프링 보안(인증, 권한) 설정
1️⃣spring.security.xml
접두사 :security를 매번쓰기 싫으니 , 아래와 같이 변경
<beans xmlns -> <beans:beans xmlns:beans
<?xml version="1.0" encoding="UTF-8"?>
<beans:beans xmlns:beans="http://www.springframework.org/schema/beans"
	xmlns:xsi="http://www.w3.org/2001/XMLSchema-instance"
	xmlns="http://www.springframework.org/schema/security"
	xsi:schemaLocation="http://www.springframework.org/schema/security http://www.springframework.org/schema/security/spring-security-3.1.xsd
		http://www.springframework.org/schema/beans http://www.springframework.org/schema/beans/spring-beans.xsd">

</beans:beans>
안에 내용 추가 (책이랑 다르게 3버전으로 했다. 책 코딩대로 하면 에러난다)
Oracle/member테이블 연동은 오후에, 가상메모리상에 계정생성+역할부여
  <!-- 추가: 보안 (인증 + 권한) 설정 -->
    <!-- auto-config="true" 속성  , 로그인이 필요한 경우 스프링이 제공하는 로그인 전용 페이지로 이동 -->
    <http auto-config="true">
        <intercept-url pattern="/customer/noticeDetail.htm" access="ROLE_USER"/>
        <intercept-url pattern="/customer/noticeEdit.htm" access="ROLE_ADMIN"/>
        <intercept-url pattern="/customer/noticeReg.htm" access="ROLE_ADMIN"/>
    </http>

    <!-- 추가: 로그인 -->
 <!--    가상메모리상에 계정생성+역할부여  -->
    <authentication-manager>
        <authentication-provider>
            <user-service>
                <user name="hong" authorities="ROLE_USER" password="1111"/>
                <user name="admin" authorities="ROLE_ADMIN" password="2222"/>
                <user name="park" authorities="ROLE_ADMIN, ROLE_USER" password="3333"/>
            </user-service>
        </authentication-provider>
    </authentication-manager>
글쓰기 페이지를 누르면 스프링이 제공하는 로그인 페이지가 나온다 .

사용자가 지정한 로그인 페이지를 연결하는 방법

1️⃣spring.security.xml에 아래코드 추가
 <!-- 2. 사용자 로그인 페이지를 사용하도록 설정. -->
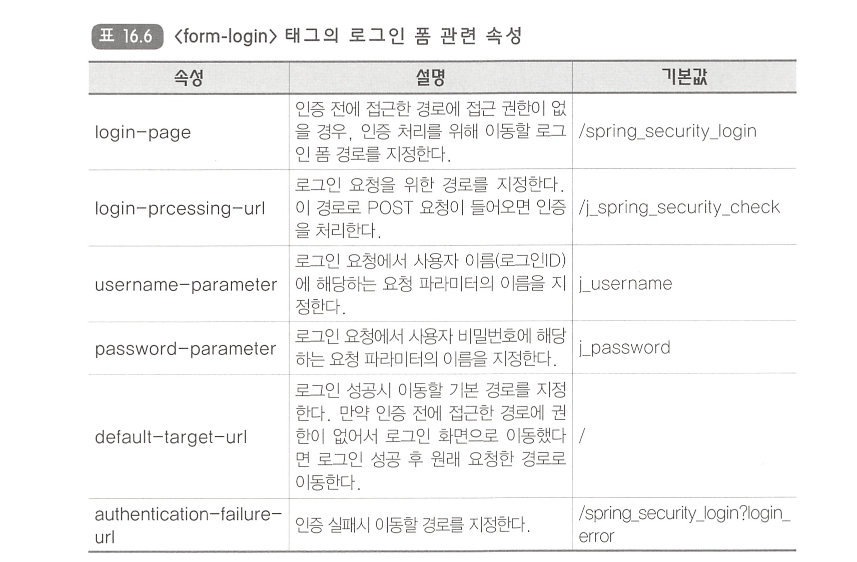
        <form-login login-page="/joinus/login.htm"/>
전체코드
<?xml version="1.0" encoding="UTF-8"?>
<beans:beans xmlns:beans="http://www.springframework.org/schema/beans"
	xmlns:xsi="http://www.w3.org/2001/XMLSchema-instance"
	xmlns="http://www.springframework.org/schema/security"
	xsi:schemaLocation="http://www.springframework.org/schema/security http://www.springframework.org/schema/security/spring-security-3.1.xsd
		http://www.springframework.org/schema/beans http://www.springframework.org/schema/beans/spring-beans.xsd">


  <!-- 추가: 보안 (인증 + 권한) 설정 -->
    <!-- auto-config="true" 속성  , 로그인이 필요한 경우 스프링이 제공하는 로그인 전용 페이지로 이동 -->
    <http auto-config="true">

        <!-- 2. 사용자 로그인 페이지를 사용하도록 설정. -->
        <form-login login-page="/joinus/login.htm"/>
        <intercept-url pattern="/customer/noticeDetail.htm" access="ROLE_USER"/>
        <intercept-url pattern="/customer/noticeEdit.htm" access="ROLE_ADMIN"/>
        <intercept-url pattern="/customer/noticeReg.htm" access="ROLE_ADMIN"/>
    </http>

    <!-- 추가: 로그인 -->
 <!--    가상메모리상에 계정생성+역할부여  -->
    <authentication-manager>
        <authentication-provider>
            <user-service>
                <user name="hong" authorities="ROLE_USER" password="1111"/>
                <user name="admin" authorities="ROLE_ADMIN" password="2222"/>
                <user name="park" authorities="ROLE_ADMIN, ROLE_USER" password="3333"/>
            </user-service>
        </authentication-provider>
    </authentication-manager>


</beans:beans>
2️⃣ joinus/login.js 수정
<form action="/j_spring_security_check" method="post">


<!-- name 속성 수정  -->
<li><label for="uid">아이디</label><input name="j_userName"class="text" /></li>
<li><label for="pwd">비밀번호</label><input type="password" name="j_password" class="text" /></li>

로그인을 하려니 ,폼태그 값을 못념겨줘서
login.jsp 수정
	<%@taglib prefix="c" uri="http://java.sun.com/jsp/jstl/core" %>

    <form action='<c:url value="/j_spring_security_check"/>' method="post">
📌일부러 로그인 실패를 발생하였는데, 아무 변화가 일어나지 않았다.
->로그인 실패하고, 다시 로그인페이지로 이동한 상태
3️⃣로그인 실패했을때 처리
spring.security.xml에 아래코드 추가
   <form-login login-page="/joinus/login.htm"
           authentication-failure-url="/joinus/login.htm?error"
        />
4️로그인 실패
login.jsp
	<div id="join-form" class="join-form margin-large">
<!-- 	추가 null이 아니라면 오류메세지를 찍자  -->
	<c:if test="${  SPRING_SECURITY_LAST_EXCEPTION != null  }">
                   Message : <c:out value="${ SPRING_SECURITY_LAST_EXCEPTION.message  }"></c:out>
                 </c:if>
	<form action='<c:url value="/j_spring_security_check"/>' method="post">
5️⃣로그인 성공
views/inc/header.jsp
pageContext.request.userPrincipal -> 인증받은 사용자 정보의 객체를 가지고 있는 객체
이것이 없다면 null을 반환
empty인지 물어보는것= 인증을 안받았냐 물어보는것
	<%@taglib prefix="c" uri="http://java.sun.com/jsp/jstl/core" %>


<%--<li><a href="${ pageContext.request.contextPath }/joinus/login.htm">로그인</a></li> --%>

        <li>
        <c:if test="${empty pageContext.request.userPrincipal }">
		<a href="${pageContext.request.contextPath }/joinus/login.htm">로그인</a>
		</c:if>

		<c:if test="${not empty pageContext.request.userPrincipal }">
		<a href="${pageContext.request.contextPath }/j_spring_security_logout">
		[${pageContext.request.userPrincipal.name }] 로그아웃 </a>
		</c:if>
        </li>
6️⃣ spring-security.xml
  <!--      로그아웃을 성공했을때 이동할 페이지 경로 설정  -->
        <logout logout-success-url="/customer/notice.htm"/>
7️⃣spring-security.xml
default-target-url="/customer/notice.htm"추가
default-target-url 로그인 후 연결되는 페이지
<form-login login-page="/joinus/login.htm"
           authentication-failure-url="/joinus/login.htm?error"
            default-target-url="/customer/notice.htm"
 />
8️⃣header.jsp 스프링 시큐리티jsp태그 라이브러리 사용해서 수정
3번으로 바꾸기
	<%@taglib prefix="s" uri="http://www.springframework.org/security/tags"%>


    <%-- 1번	<li><a href="${ pageContext.request.contextPath }/joinus/login.htm">로그인</a></li> --%>

		<%-- 2번
		<li><c:if test="${empty pageContext.request.userPrincipal }">
					<a href="${pageContext.request.contextPath }/joinus/login.htm">로그인</a>
				</c:if>
				<c:if test="${not empty pageContext.request.userPrincipal }">
					<a href="${pageContext.request.contextPath }/j_spring_security_logout">
						[${pageContext.request.userPrincipal.name }] 로그아웃 </a>
				</c:if></li> --%>


<!-- 	3번		스프링 시큐리티jsp태그 라이브러리 사용해서 수정 -->
		<s:authorize ifNotGranted="ROLE_USER"> <!-- 로그인을 안했다면  -->
		<a href="${pageContext.request.contextPath }/joinus/login.htm">로그인</a>
		</s:authorize>
		<s:authorize ifAnyGranted="ROLE_USER, ROLE_ADMIN"> <!-- 로그인을 했다면  -->
		[${pageContext.request.userPrincipal.name }] 로그아웃 </a>
		</s:authorize>
9️⃣notice jsp 글쓰기권한
<%@taglib prefix="s" uri="http://www.springframework.org/security/tags" %>

<s:authorize ifAllGranted="ROLE_USER, ROLE_ADMIN">
    <a class="btn-write button" href="noticeReg.htm">글쓰기</a>
</s:authorize>
🔟 공지사항쓰기->작성자(kenik) 로그인인증
CustomerController.noticeReg(){} 수정
	//	notice.setWriter("daniel"); //아이디
		//인증받은 이름으로 바꾸자
		UserDetails user = (UserDetails) SecurityContextHolder.getContext().getAuthentication().getPrincipal();
		notice.setWriter(user.getUsername());
두번째방법
@RequestMapping(value = {"noticeReg.htm"}, method = RequestMethod.POST)
public String noticeReg(
    Notice notice
    , HttpServletRequest request
    , Principal principal
) throws Exception {


	notice.setWriter(principal.getName());


this.memberShipService.insertAndPointUpOfMember(notice, principal.getName());
디비연동
p693
<jdbc-user-service>
표 16-4 users-by-username-query 속성
authorities-by-username-query 속성
1️⃣회원가입을 하자
join.jsp에서 <form action="join.htm" method="post">로 되어있으니
join컨트롤러에서
   @RequestMapping( value =  {"join.htm"}, method = RequestMethod.POST )
   public String join( Member member ) throws Exception{
      this.memberDao.insert(member); // 회원 insert
      return "redirect:../index.htm";

   }
이름이 안들어갔던이유
join.jsp에서

name이 DB랑 다르다.
security.xml
<!-- DB 연동  -->
 <authentication-manager>
     <authentication-provider>
        <jdbc-user-service
            data-source-ref="dataSource"
            users-by-username-query="select id as username, pwd as password, 1 as enabled from member where id = ?"
            authorities-by-username-query="select id as  username , case when id='admin' then 'ROLE_ADMIN' else 'ROLE_USER' end as authority from member where id = ?"
        />
     </authentication-provider>
</authentication-manager>'Spring' 카테고리의 다른 글
| [Spring] 스프링 5.0 의존성주입 (0) | 2022.07.24 |
|---|---|
| [Spring] Spring과 MyBatis (0) | 2022.07.22 |
| [Spring] 스프링 레거시 프로젝트 4.0버전 (0) | 2022.07.20 |
| [Spring] 스프링 트랜잭션 격리성 (0) | 2022.07.19 |
| [Spring] 트랜잭션 (0) | 2022.07.18 |


