
Jam's story
[Spring] MVC2 모델을 이용한 게시판 구현 본문
과제 7,8,9장 읽어오기
어제 수업에 이어서 공지사항 상세보기
NoticeDetailController.java
package controllers.customer;

import java.util.List;

import javax.servlet.http.HttpServletRequest;
import javax.servlet.http.HttpServletResponse;

import org.springframework.web.servlet.ModelAndView;
import org.springframework.web.servlet.mvc.Controller;

import newlecture.dao.NoticeDao;
import newlecture.vo.Notice;

public class NoticeDetailController implements Controller{
private NoticeDao noticeDao;


	public NoticeDetailController() {
	super();}

	public NoticeDetailController(NoticeDao noticeDao) {
	super();
	this.noticeDao = noticeDao;
}


	public NoticeDao getNoticeDao() {
		return noticeDao;
	}

	public void setNoticeDao(NoticeDao noticeDao) {
		this.noticeDao = noticeDao;
	}

	@Override
	public ModelAndView handleRequest(HttpServletRequest request, HttpServletResponse response) throws Exception {
	    //파라미터로 넘어오는 것을 받기
		String pseq = request.getParameter("seq");
	    //필트초기화
	   int seq=1;

	    //파라미터가 넘어온다면 integer로 파싱
	    if ( pseq != null && !pseq.equals("") ) {
	       seq= Integer.parseInt( pseq );
	    }

	    //Notice 객체를 받아와서
	    Notice notice=this.noticeDao.getNotice(pseq);
	    ModelAndView mv = new ModelAndView();
	    //mv에 속성 설정 notice이름으로 notice 객체를 넣어주기
	    mv.addObject("notice", notice);
	    mv.setViewName("noticeDetail.jsp");
	    return mv;
	}

}
NoticeDetail.jsp
					<div id="notice-article-detail" class="article-detail margin-large" >
						<dl class="article-detail-row">
							<dt class="article-detail-title">
								제목
							</dt>
							<dd class="article-detail-data">
								${notice.title}
							</dd>
						</dl>
						<dl class="article-detail-row">
							<dt class="article-detail-title">
								작성일
							</dt>
							<dd class="article-detail-data">
							${notice.regdate}
							</dd>
						</dl>
						<dl class="article-detail-row half-row">
							<dt class="article-detail-title">
								작성자
							</dt>
							<dd class="article-detail-data half-data" >
							${notice.writer}
							</dd>
						</dl>
						<dl class="article-detail-row half-row">
							<dt class="article-detail-title">
								조회수
							</dt>
							<dd class="article-detail-data half-data">
							${notice.hit}
							</dd>
						</dl>
						<dl class="article-detail-row">
							<dt class="article-detail-title">
								첨부파일
							</dt>
							<dd class="article-detail-data">
								<a href="">${notice.filesrc}</a>
							</dd>
						</dl>

						<div class="article-content" >${notice.content }</div>
					</div>
					<p class="article-comment margin-small">
					htm을 수정, 서블릿으로 거쳐야하니, jsp로 아닌, htm
						<a class="btn-list button" href="notice.htm">목록</a>
						<a class="btn-edit button" href="noticeEdit.htm">수정</a>
						<a class="btn-del button" href="noticeDel.htm">삭제</a>
					</p>
Dispatcher-servlet.xml 에 추가
 <bean name="/customer/noticeDetail.htm"  class="controllers.customer.NoticeDetailController">
 <property name="noticeDao" ref="noticeDao"></property>
</bean>
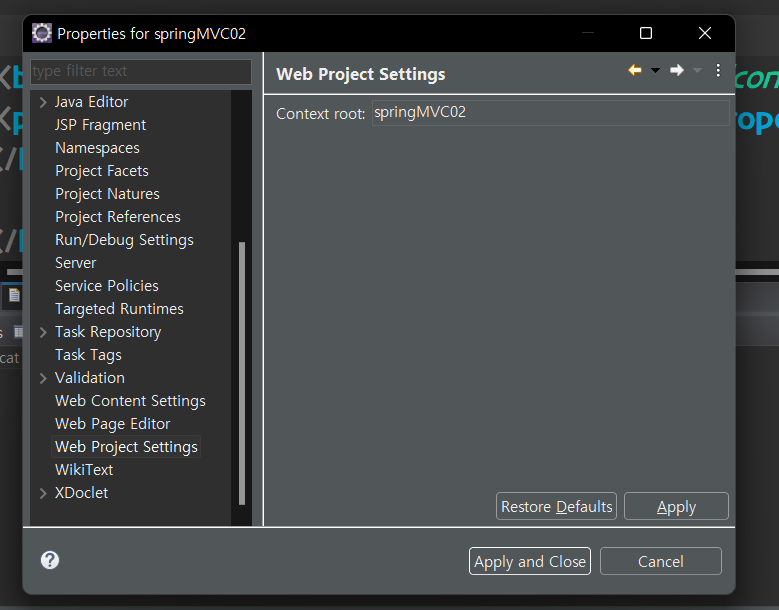
SpringMVC 복사해서 SpringMVC02프로젝트 만들기
📌주의!!
복사하다보니 ,Context root가 변경이 안되어서 , 변경해주어야 한다.
컴포넌트스캔
dispatcher-servlet.xml 에 패키지명을 적어준다.
<context:component-scan base-package="newlecture.dao, controllers.customer"></context:component-scan>
2.NoticeDAO 위에 추가 - 스캔되기 위해서
@Repository @Controller는 @Component의 하위애노테이션
//@Component 이걸로 해도된다.
@Repository //id가 noticeDAO로 잡힌다.
public class NoticeDao {
3.컨트롤러
NoticeController
@RequestMapping("") 어떤거에 의해서 호출되는지 , 컨트롤러와 요청을 매핑시켜줌
@org.springframework.stereotype.Controller //컨트롤러 어노테이션
@RequestMapping("/customer/notice.htm") //어떤거에 의해서 호출되는지
//컨트롤러와 요청을 매핑시켜줌
public class NoticeController implements Controller{

	@Autowired   //이것이 자동으로 주입되어야해서
	private NoticeDao noticeDao;
NoticeDetailController
@org.springframework.stereotype.Controller
@RequestMapping("/customer/noticeDetail.htm")
public class NoticeDetailController implements Controller{

	@Autowired   //이것이 자동으로 주입되어야해서
	private NoticeDao noticeDao;
컨트롤러 구현 과정
1) @Controller 애노테이션을 클래스에 적는다.
2) @RequestMapping 으로 처리할 요청 경로를 지정한다.
3) 웹 브라우저의 요청을 처리할 메서드를 구현하고 뷰 이름 리턴
컨트롤러 안의 메소드는
1)클라이언트의 요청 처리
2)모델을 이용하여 처리 결과 데이터를 뷰에 전달
1)파라미터에 Model을 넣어서 (Model m)
m.addAttribute("이름" ,"값")
2) ModelAndView 사용
ModelAndView m=new ModelAndView();
m.setObject("뷰이름");
m.setViewName("뷰이름 ");
SpringMVC02 복사해서 SpringMVC03프로젝트 만들기
글목록과 글 상세보기
1️⃣컨트롤러를 각각 만드는 것이 아니라 한개만 만들겠다 => CustomerController.java 파일추가
package controllers;

import java.sql.SQLException;
import java.util.List;

import javax.servlet.http.HttpServletRequest;
import javax.servlet.http.HttpServletResponse;

import org.springframework.beans.factory.annotation.Autowired;
import org.springframework.stereotype.Controller;
import org.springframework.web.bind.annotation.RequestMapping;
import org.springframework.web.servlet.ModelAndView;

import newlecture.dao.NoticeDao;
import newlecture.vo.Notice;
//각각의 Controller 클래스가 메소드로 들어온다고 생각하자
//xml에 패키지 설정을 해주었기 '때문에 이 컨트롤러가 나온다 .

@Controller
public class CustomerController {

	//이것이 자동으로 주입되어야해서
	//생성자 ,getter,setter가 와도 된다.
	@Autowired
	private NoticeDao noticeDao;


	public CustomerController() {
		super();
		// TODO Auto-generated constructor stub
	}


	public CustomerController(NoticeDao noticeDao) {
		super();
		this.noticeDao = noticeDao;
	}


	public NoticeDao getNoticeDao() {
		return noticeDao;
	}


	public void setNoticeDao(NoticeDao noticeDao) {
		this.noticeDao = noticeDao;
	}


	//공지사항 목록 컨트롤러 메소드  <= NoticeController.java
	//어떤거에 의해서 호출되는지 컨트롤러와 요청을 매핑시켜줌
	//메소드 위에 붙여주기
	@RequestMapping("/customer/notice.htm")
	public ModelAndView notices(HttpServletRequest request, HttpServletResponse response) throws ClassNotFoundException, SQLException {
		 String ppage = request.getParameter("page");
		    String pfield = request.getParameter("field");
		    String pquery = request.getParameter("query");
		    //필트초기화
		    int page = 1;
		    String field = "title", query = "";

		    //파라미터가 넘어온다면 integer로 파싱
		    if ( ppage != null && !ppage.equals("") ) {
		        page = Integer.parseInt(ppage);
		    }
		    if ( pfield != null && !pfield.equals("") ) {
		        field = pfield;
		    }
		    if ( pquery != null && !pquery.equals("") ) {
		        query = pquery;
		    }

		    //처리결과를 => ModelAndView 리턴값
		    //jsp처럼 setRequest X
		    ModelAndView mv = new ModelAndView();
		    //request.setAttribute("test", "Hello.Spring MVC World!");
		    // mv.addObject(파라미터이름, 값)
		    mv.addObject("test", "Hello.Spring MVC World!");

		    //noticeDao.getNotice()
		    List<Notice> list = this.noticeDao.getNotices(page, field, query);
		    mv.addObject("list",list);
		    mv.setViewName("notice.jsp");
		    return mv;
	}
	//공지사항 상세 컨트롤럴메소드 <= NoticeDetailController.java
}
2️⃣dispatcher-servlet .xml
context:component-scan base-package="newlecture.dao, controllers"></context:component-scan>
3️⃣디테일까지 추가
package controllers;

import java.sql.SQLException;
import java.util.List;

import javax.servlet.http.HttpServletRequest;
import javax.servlet.http.HttpServletResponse;

import org.springframework.beans.factory.annotation.Autowired;
import org.springframework.stereotype.Controller;
import org.springframework.web.bind.annotation.RequestMapping;
import org.springframework.web.servlet.ModelAndView;

import newlecture.dao.NoticeDao;
import newlecture.vo.Notice;
//각각의 Controller 클래스가 메소드로 들어온다고 생각하자
//xml에 패키지 설정을 해주었기 '때문에 이 컨트롤러가 나온다 .

@Controller
@RequestMapping("/customer/*")
public class CustomerController {

   //이것이 자동으로 주입되어야해서
   //생성자 ,getter,setter가 와도 된다.
   @Autowired
   private NoticeDao noticeDao;


   public CustomerController() {
      super();
      // TODO Auto-generated constructor stub
   }


   public CustomerController(NoticeDao noticeDao) {
      super();
      this.noticeDao = noticeDao;
   }


   public NoticeDao getNoticeDao() {
      return noticeDao;
   }


   public void setNoticeDao(NoticeDao noticeDao) {
      this.noticeDao = noticeDao;
   }


   //공지사항 목록 컨트롤러 메소드  <= NoticeController.java
   //어떤거에 의해서 호출되는지 컨트롤러와 요청을 매핑시켜줌
   //메소드 위에 붙여주기
   //@RequestMapping("/customer/notice.htm")
   //@RequestMapping("/customer/*")를 클래스 위에 삽입했기에 아래와 같이  변경
   @RequestMapping("notice.htm")
   public ModelAndView notices(HttpServletRequest request, HttpServletResponse response) throws ClassNotFoundException, SQLException {
       String ppage = request.getParameter("page");
          String pfield = request.getParameter("field");
          String pquery = request.getParameter("query");
          //필트초기화
          int page = 1;
          String field = "title", query = "";

          //파라미터가 넘어온다면 integer로 파싱
          if ( ppage != null && !ppage.equals("") ) {
              page = Integer.parseInt(ppage);
          }
          if ( pfield != null && !pfield.equals("") ) {
              field = pfield;
          }
          if ( pquery != null && !pquery.equals("") ) {
              query = pquery;
          }

          //처리결과를 => ModelAndView 리턴값
          //jsp처럼 setRequest X
          ModelAndView mv = new ModelAndView();
          //request.setAttribute("test", "Hello.Spring MVC World!");
          // mv.addObject(파라미터이름, 값)
          mv.addObject("test", "Hello.Spring MVC World!");

          //noticeDao.getNotice()
          List<Notice> list = this.noticeDao.getNotices(page, field, query);
          mv.addObject("list",list);
          mv.setViewName("notice.jsp");
          return mv;
   }
   //공지사항 상세 컨트롤럴메소드 <= NoticeDetailController.java
   //@RequestMapping("/customer/noticeDetail.htm")
   @RequestMapping("noticeDetail.htm")
   public ModelAndView noticeDetail(HttpServletRequest request, HttpServletResponse response) throws Exception {
       //파라미터로 넘어오는 것을 받기
      String pseq = request.getParameter("seq");
       //필트초기화
      int seq=1;

       //파라미터가 넘어온다면 integer로 파싱
       if ( pseq != null && !pseq.equals("") ) {
          seq= Integer.parseInt( pseq );
       }

       //Notice 객체를 받아와서
       Notice notice=this.noticeDao.getNotice(pseq);
       ModelAndView mv = new ModelAndView();
       //mv에 속성 설정 notice이름으로 notice 객체를 넣어주기
       mv.addObject("notice", notice);
       mv.setViewName("noticeDetail.jsp");
       return mv;
   }
}
4️⃣ noticeDetail 수정하기
Model객체를 파라미터로 선언 -> jsp까지 전달가능
+jsp를 반환하니 String 형으로
	@RequestMapping("noticeDetail.htm")
	public String noticeDetail(HttpSession session
			,Model model
			,String seq
			) throws Exception {
	    Notice notice=this.noticeDao.getNotice(seq);
	    model.addAttribute("notice",notice);
	    return "noticeDetail.jsp";
	}
5️⃣ notices() 수정 + @RequestParam을 이용하여 파라미터의 기본값까지 설정하자 notices()
+jsp를 반환하니 String 형으로
	// /customer/notice.htm?page=1&field=title&query=hh
	@RequestMapping("notice.htm")
	public String notices(
			@RequestParam(value="page",defaultValue="1") int page,
			@RequestParam(value="field",defaultValue="title") String field,
			@RequestParam(value="query",defaultValue="") String query, //파라미터랑 이 변수명이랑 똑같게
			 Model model) throws Exception {

		    List<Notice> list = this.noticeDao.getNotices(page,field,query);
		    model.addAttribute("list",list);
		    model.addAttribute("test", "hello");

		    return "notice.jsp";
	}
글쓰기
1️⃣notice.jsp에서 글쓰기 버튼을 notice.htm 으로 바꾸기
<!-- <a class="btn-write button" href="noticeReg.jsp">글쓰기</a> -->
<a class="btn-write button" href="noticeReg.htm">글쓰기</a>

2️⃣-1️⃣ CustomerControllerd애 notieReg 컨트롤러 메소드 선언 +GET/ POST 나누기
get 방식=noticeReg.jsp로 이동 /POST라면 (일단은 null)
	@RequestMapping("noticeReg.htm")
	public String noticeReg(HttpServletRequest request) throws Exception {
		String requestMethod=request.getMethod(); //get인지 post인지
		if(requestMethod.equals("GET")) {
		    return "noticeReg.jsp";}
		else { //POST라면
		return null;
		}
	}
2️⃣-2️⃣ 다른방법
method=RequestMethod.GET
method=RequestMethod.POST
Get방식이라면
	@RequestMapping(value={"noticeReg.htm"}, method=RequestMethod.GET)
	public String noticeReg(HttpServletRequest request) throws Exception {
		    return "noticeReg.jsp";
	}
Post
	@RequestMapping(value={"noticeReg.htm"}, method=RequestMethod.POST)
	public String noticeReg(String title, String content) throws Exception {
		Notice notice=new Notice();
		notice.setWriter("kenik"); //로그인한 아이디
		notice.setTitle(title);
		notice.setContent(content);
		int rowCount=this.noticeDao.insert(notice);
		if(rowCount==1) {
			//리다이렉트 :공지사항목록
			//jsp : 리다이렉트 = response.sendRedirect("list.do")
			//do로 요청해야 핸들러를 거쳐서 목록을 가져오니

			//스프링에서 리다이렉트 ?  [redirect:]접두어 사용
			return "redirect:notice.htm";
			//htm 이라고 해야 , 추가된 데이터를 가져온다.
		}else {
			return "noticeReg.jsp?error";
		}

	}
⭐매개변수에 Notice 객체를 주기
전달받을 객체를 메서드의 파라미터로 지정해주면
@RequestMapping 이 적용된 메서드의 파라미터에 객체를 추가하면 그 객체의 set메서드를 호출해서
파라미터값을 전달한다.
그래서 따로 setter로 지정해줄 필요가 없다 !
커멘드 객체는 뷰에 전달할 모델에 자동으로 포함되고 , 클래스의 이름의 첫글자를 소문자로 변환한 이름을 사용한다
@RequestMapping( value = {"noticeReg.htm"}, method = RequestMethod.POST )
       public String noticeReg(Notice notice ) throws Exception {

            int rowCount = this.noticeDao.insert(notice);
            notice.setWriter("kenik");
            if (rowCount==1) {

               return "redirect:notice.htm";

            }else {

               return "redirect:noticeReg.jsp?error";
            }
      } // noticeReg
3️⃣회원을 한명 추가 -sql developer 에서
INSERT INTO MEMBER(ID, PWD, NAME, GENDER, BIRTH, IS_LUNAR, CPHONE, EMAIL, HABIT, REGDATE)
VALUES( 'kenik','1234','관리자','남성','1988-02-17','lunar','010-1234-1234','kenik@sist.co.kr','movie,trip', SYSDATE)
글 수정하기
수정하기 버튼 = /customer/noticeEdit.htm + 수정할 공지사항 글번호 파라미터
1️⃣jsp 수정
<a class="btn-edit button" href="noticeEdit.htm?seq=${notice.seq}">수정</a>
<a class="btn-del button" href="noticeDel.htm?seq=${notice.seq}">삭제</a>
2️⃣ 컨트롤러 메소드 선언 : noticeEdit + GET/POST
1)seq=1 ->Notice 객체 생성
2)NotieEdit.jsp 이동
수정이 완료된 후에는 noticeDetail 상세 보기 페이지
	@RequestMapping(value={"noticeEdit.htm"}, method=RequestMethod.GET)
	public String noticeEdit() throws Exception {
		    return "noticeEdit.jsp";
	}
noticeEdit.jsp
<form action="" method="post">
post방식이어서 a(get방식은 안된다 .그래서 수정 )
<input type="submit" class="btn-save button"  value="수정 ">
	@RequestMapping(value={"noticeEdit.htm"}, method=RequestMethod.POST)
	public String noticeEdit(Notice notice) throws Exception {
		int rowCount = this.noticeDao.update(notice);
		//htm을 해야 다시 요청 하고 핸들러
			return "redirect:noticeDetail.htm?seq="+notice.getSeq();  //수정된 대로 다시 요청해야하니, 리다이렉트

	}
공지사항 삭제
1️⃣noticeDetail.jsp 에서 삭제하기 버튼
<a class="btn-del button" href="noticeDel.htm?seq=${notice.seq}">삭제</a>
				<script>
  $(".btn-del button").on("click", function(event) {
        if(  !window.confirm("정말 삭제할까요 ? ") ){
         event.preventDefault();
        }
  });
</script>
2️⃣CustomerController에 noticeDel메소드 선언
@RequestMapping(value= {"noticeDel.htm"})
public String noticeDel(String seq) throws Exception{
	noticeDao.delete(seq);
	return "redirect:notice.htm";
}
'Spring' 카테고리의 다른 글
| [Spring] 파일업로드 (0) | 2022.07.15 |
|---|---|
| [Spring] 스프링 파일 업로드 (0) | 2022.07.14 |
| [Spring] 다이나믹웹프로젝트생성과 MVC2패턴 (0) | 2022.07.13 |
| [Spring] days03- @Aspect 애노테이션을 이용한 AOP (0) | 2022.07.13 |
| [Spring] days02 - AOP (0) | 2022.07.12 |


